I have toying with the idea of making an object with a center section of wood that is slanted. I had made a box with different horizontal layers but thought how about one where a section of wood was at an angle to the general turning. I looked at having the wood cut at 30, 60 and 45 degrees to the axis, I finally selected 45 degrees to the axis. To cut the wood on an angle I choose to use my table saw. Since the block of wood was short, I decide I needed more control.
I glued the block of wood to a board. You can see the paper bag I used between the board and the block of wood to allow easy separation later on.
You can see how I mounted the board to the miter to ensure I would get a smooth cut and no wiggling. I used an Incra 1000 SE miter with adjustable slide wheels that remove an slop in the miter slide. It also has more area to clamp the board to.
Unfortunately, the blade did not cut completely thru the block. I use the band saw to cut the remainder of the wood. I choose not to use the band saw for the actual cut because I have had the band saw blade bend and I wanted a smooth surface for gluing. I got rid of of the edge using a belt sander.
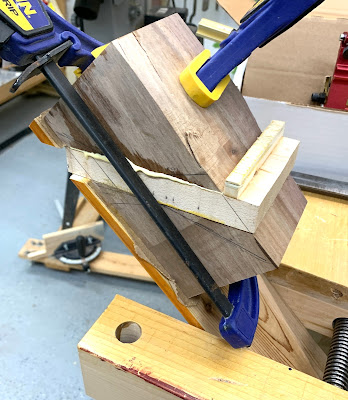
To glue the contrasting wood on at a 45 degree angle I secured the board in my vise at 45 degrees and then used a weight to press the wood down. I noticed that I did not have the wood aligned correctly and removed the wood before the glue set. Notice in the picture below that I drew lines to help align the maple wood correctly.
To keep the dark wood in place and not slide, I CA glued a small strip of wood a the base to keep the wood from moving while clamped.
Clamps removed. You can see the lip I added and the alignment lines on the maple.
I then glued another piece of birdseye maple on the bottom using the board to help align the wood.
I used a screw driver to remove the board from the block. You can see the remnants of the paper bag.
I used a band saw to cut the maple that was sticking out past the dark wood. I then glued a mounting block to the bottom to make turning the bottom easier.
Here the wood has been turned round and the finishing touches need to be done. The darker wood is actually softer than the maple with a courser grain.
This is the finished shape. As I was turning it the cracks in the end became more difficult to work with and were cut off and the two section mounting block separated and I had to clamp on to the darker wood of the mounting block. I used a Forstner bit to hollow out the main section of the wood using an extension to get to the depth I wanted. I then set up my stabilizer wheels to hold the extended wood secure and used my boring bar to hollow out the inside past what the Forstner bit did.

I turned the wood around to finish the bottom and here in lies another story. The rubber feet holding the top section in the chuck I made using a wood dowel and clear rubber hose. For this small of a diameter I could only use four pads on the chuck. As I was cutting a recess on the bottom I discovered the bottom was too thing and I had three small holes in it. It was so thin light would come thru the bottom. I cut a hole in the bottom without the stabilizer wheels and it was off center. Badly off center. I decided I would use my drill press to drill a hole using a Forstner bit. That missed up the end real bad as I could not hold the piece of wood steady. Back to the stabilizer wheels. To protect the finish I wrapped several layers of masking tape, which is easier to remove from wood then duct tape, and then added the more durable duct tape on top of that. Once Stable I was able to cut off the damaged wood and use a 2" Forstner bit to cut a recess in the wood. I cut a section of darker wood as an insert into the recess. My mistake turned into a feature. Below is the finished product. The top two inches of the inside are sanded and finished. Finish is gloss wipe on poly.


Above is the engraved bottom with my mark and the date finished in Huron Beach, Michigan.
Above is the box with a lid I made for it using birds eye maple and the same darker wood. Now both the top and the bottom have contrasting inserts.


